JamMK header

JamMK header

Sunday, 30 August 2015

The obtainable dream

I would say that at this time of year that we eat like kings but as kings historically have gorged themselves on meat, believing vegetables to be unhealthy food for peasants, that wouldn't be quite correct. What I mean is, we eat well at this time of year, able to make some lovely meals not by spending a fortune on expensive food but by starting with the very freshest vegetables and in such quantities that you don't feel that you have to eek them out.

It's been 18 years since I first moved out of my parental home and during that time I have slowly developed as a gardener and a cook. I guess as we flick through magazines and images on Pinterest, we all have a vague idea of the sort of lifestyle we would like to lead and we have moments when we make an effort to follow that lifestyle. There will be other days when life gets in the way and reality is a long way from your idyll.

Today, as I stood in the kitchen preparing the Sunday roast I realised that this particular day I had lived the lifestyle that I had been aiming for. My day had started with a bowl of homemade granola for breakfast before setting up the bread machine. I spent the morning making a beetroot cake with a glut of beetroot, followed by a batch of pea and ham soup from some old peas I'd picked the day before. We had soup and freshly baked rolls for lunch. The afternoon was spent in my eldest daughter's bedroom, helping her decorate her wall with an intricate pattern along the lines of an elaborate doodle. We didn't finish the task before I had to stop to get the roast on; a chicken stuffed with homegrown onions and sage and baked in a chicken brick Steve had unearthed at the back of the garage, in a stock of onion, celery and elephant garlic. The potatoes for the roasts were homegrown and so were the carrots, parsnips, runner beans and corn on the cob. A full meal with all homegrown vegetables and every meal homemade from scratch.


When you ask someone to describe their ideal day they are unlikely to describe such an apparently mundane day of domesticity but this day was special because it had been so ordinary and yet just the sort of way I want to live my life. I have always wanted to feed myself and my family well, knowing what goes into the food and for that food to be tasty. It was lovely to look back on my day today and realise that I had managed that today and, more importantly, had done it without consciously working at it. It had not been a slog, a driven attempt to achieve something for the sake of achieving it or proving a point. It had just happened and as all part of a relaxed and enjoyable family day. I'm just glad I noticed and took the time to bask, momentarily, in my private glory! There will be days in the future when my halo slips and I cram something from a packet hurriedly into my family as I bark irritated commands at them and go to bed feeling exhausted and unfulfilled. At least I now know that my dream is obtainable at least some of the time.

Beetroot Cake


This is an unusual beetroot cake because it does not involve chocolate. It isn't overly sweet and it has a pleasant flavour that is difficult to pin down but has hints of coconut, general cakey-ness and, of course, beetroot.

10 oz (280g) grated raw beetroot (11 oz; 310 g unprepared beetroot; about 2 cricket ball sized)
3 fl oz (85ml) sunflower oil
4 oz (110g) caster sugar
3 eggs
6 oz (175g) flour
3 tsp baking powder
Pinch of salt
1 tsp mixed spice
2 oz (55g) desiccated coconut


Preheat an oven to 180 °C, 350 °F, gas mark 4.  Wash the beetroot then peel off the skin and cut off the top and tail.  Cut the beetroot into quarters and place in a food processor to finely chop, or grate with a cheese grater.  Place all the ingredients in a bowl and combine.  Grease the cake tin and spoon the cake mix into it.  Cook in the centre of the oven for 55 to 60 minutes until golden brown and a skewer inserted into it comes away clean.  Allow the cake to cool in the tin for 10 to 20 minutes then turn out onto a wire rack to cool completely.


Saturday, 29 August 2015

Veggie "Sausage" Rolls

I haven't really been paying much attention to the root vegetable bed recently. With courgettes, plums, apples and sweetcorn all crying out daily for attention right now, it is easy to forget about these quieter, more patient and less needy members of the vegetable family.

It was really my youngest daughter who brought my attention to the beetroot this afternoon. Once again, on her little plot, she is growing yellow vegetables (yellow is her favourite colour). As we went out to harvest some vegetables to throw into the stir-fry I had planned for dinner, I said to her that it would be nice to harvest one of her yellow beetroot to include in the stir-fry too. Yellow beetroot in many ways is more versatile than the usual purple variety because it can go safely into casseroles and stir-fries, adding flavour without turing everything an alarming pink.

My attention, once again, was caught by the block of sweetcorn plants and as I stood there wondering which 4 cobs to pick for dinner, my daughter rushed round to her plot and a moment later came running back proudly holding a perfect yellow beetroot. I suggested she might also like to pull some yellow carrots and as she sped away I thought I ought to go and supervise so that she didn't get too carried away and pull up stuff that wasn't ready. A couple of carrots later she zoomed off to where my beetroots were growing and started crying out enthusiastically about all the "enormous" beetroots she could see. And it was true, there were loads of cricket ball sized roots all pushing themselves and their neighbours out of the ground. And there were others too, the size of large marbles but too wedged in with their neighbours to grow any bigger. Everything was overdue for some attention.

For the next 10 minutes or so my daughter helped to pull out all the large beetroot that were in danger of turning woody if allowed to get any bigger. Then she helped pull out some close growing smaller ones that I promised I would make into pickled whole baby beets for her. There were carrots and parsnips in the bed too, in similar need of thinning so I did theses as I went. And then, as suddenly as her enthusiasm for beetroot had arrived, it went and she announced, "I just want to play now." So off she went whilst I finished the job.


Later, I returned to the kitchen with baskets full of stuff and plenty of carrots and beetroot so it seemed like the perfect opportunity to try out a recipe from the Good Food Magazine for "Veg & Cheese Rolls". As usual, I couldn't help but fiddle with the recipe, leaving out the almonds (a bit odd on savoury pastries) and adding mushroom, garlic, nutmeg, umani paste and a splash of mushroom ketchup to add a "meatiness" to the flavours.

Once cooked, I called the family to tuck in to one each. Suddenly my youngest regained her beetroot enthusiasm and tucked in, quickly polishing it off. This was pleasing but fairly predictable as she loves eating and particularly loves vegetables. My eldest, always a reluctant vegetable eater, wouldn't even try them. Ho-hum, you win some, you lose some. Definitely a recipe to make again though.


Veggie "Sausage" Rolls (makes 8)


  • 1tbsp olive oil
  • 1 large onion, finely chopped
  • 2 carrots, grated
  • 1 beetroot, grated
  • 1 large closed cup mushroom, finely chopped
  • 1 clove of garlic
  • Pinch of dried herbs
  • 1 tsp umani paste
  • 1/2 tsp grated nutmeg
  • Splash of mushroom ketchup and/or soy sauce
  • 85g mature cheddar, grated
  • 320g sheet puff pastry
  • Egg or milk for glazing

Method

  1. Heat the oil in a large pan. Add the onion and sizzle for 5 mins, stirring now and then, until softened. Add the carrot and beetroot and cook gently for 5 mins, stirring until the veg is soft. Add the mushroom and garlic and continue to cook for 3 or 4 minutes more, adding the herbs, umani paste, nutmeg, mushroom ketchup and soy sauce. Tip into a bowl.
  2. Stir the cheese into the vegetable mixture while it’s still warm the allow to cool.
  3. Unroll the pastry. Cut in half lengthways, then pile the cooled filling down the middle of each strip of pastry. Brush the edges of the pastry with a little beaten egg or milk, then fold the sides over to cover the filling. Turn the rolls over so the pastry seam is tucked underneath and cut each roll into 4, so you have 8. Place on a greased baking tray and glaze. Heat oven to 200C/180C fan/gas 6.
  4. Bake for 20 mins until golden brown. Serve the rolls warm or cold.

Sunday, 23 August 2015

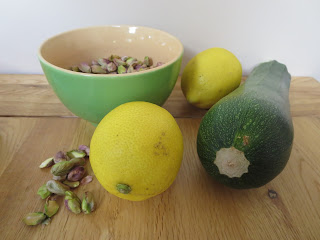
Pistachio, Courgette & Lemon Cake

Today was Steve's birthday so cake was required. There are several ways to decide what sort of cake to bake for someone's birthday. Sometimes there is a theme to a birthday and the cake is made to fit that. Sometimes the birthday star will request their favourite or some kind of special cake for their birthday. Some people might flick idly through a recipe book, looking for inspiration. The person who lives in a world of seasonal ingredients looks at what they have to hand and wondered how best to fashion them into cake.

With my courgette glut very much on my mind, it was nice to sit down for breakfast the other morning and thumb through the August edition of the Good Food Magazine, promising things to do with courgettes. Most of the recipes were sensible, savoury affairs but my eye was drawn towards the one for Pistachio, Courgette & Lemon Cake. Hmmm... Steve's favourite cakes are always lemon flavoured... and it contains courgettes... no brainer really. I stocked up on a 200g bag of pistachios and some Greek yoghurt and I was all set.


Yesterday, I spent about half an hour sat at the kitchen table shelling the whole bag of pistachios whilst verbally helping my youngest daughter who was busily creating an elephant out of modelling clay. I suspected that a 200g bag of pistachios in shells would not yield the required 150g of nuts and indeed discovered it gave me about 95g. By this point not only was I all out of pistachios but my fingers hurts, my nails were notched and I was bored with the shelling process. I did have a rather attractive pile of empty pistachio shells that looked like they might make a nice mulch for the garden if I had a ton or so more. Still, they looked rather nice around my root ginger plant, I discovered later.


Anyway, the cake baked beautifully and once it was cool, I wrapped it up in foil until this morning. (The modelling clay elephant turned out well too, should you be interested.) Then I mixed up 5 oz of icing sugar with the juice of half a lemon and asked my eldest if she fancied using her icing kit (a Christmas present) to decorate the cake. This evening, after dinner with his two eldest children and the girls, it was time to cut Steve's cake and very tasty it was too. A nice texture and a good lemony flavour. Even his son, still recovering from the trauma of too many courgettes in his childhood, was none the wiser!


http://www.bbcgoodfood.com/recipes/pistachio-courgette-lemon-cake

Saturday, 22 August 2015

Courgette Bread Rolls

At this time of year when the courgette glut seems to grow daily, I am always keen to find new ways to make use of courgettes and all the better if I can't actually tell it has courgette in it! Don't get me wrong, I do like eating courgettes and find them particularly tasty if lightly fried with mushrooms and garlic. However, when you have several pounds of the things to work with, it is nice to not taste every ounce. They are, of course, an essential chutney ingredient too so never go to waste but it is fun finding ways to include them in bakes.

I made a batch of my favourite chocolate and courgette muffins a couple of days ago and when I bit into the gorgeous moist and crumbly texture I wondered what else might benefit from the addition of courgette. I remembered reading a courgette bread recipe in my bread machine recipe book so I had a google and got a few ideas then today gave it a go. Whilst the bread machine was busy doing its thing, I used a marrow (overgrown courgette) in a batch of piccalilli and made a lemon, courgette and pistachio cake ready for Steve's birthday tomorrow.

Later, as the bread rolls were cooling on a rack, I called my girls in for their afternoon snack - a drink and a chocolate courgette muffin. These muffins have been a regular feature on their summer menu for many years so they are totally cool with the idea that their cakes will probably contain grated vegetable. Besides, there is no denying that they are absolutely delicious. As she munched on her muffin, my eldest said, "These muffins have got courgette in them, right?"

I looked around at the various results of a busy day in the kitchen and said, "Actually, Love, absolutely everything has got courgette in it!"

The bread rolls with lovely, by the way. There was nothing to suggest that they contained courgette and, indeed, they were indistinguishable from my usual bread rolls - crusty on the outside and soft and springy on the inside. To be honest, I would question the point of adding the courgette as it did not improve the bread but given that it didn't detract from its usual quality either, I guess you could argue that they are nutritionally better and my kitchen is 6 oz of courgette lighter than it was before I made them!


Courgette Bread Rolls (makes 8)

2 fl oz water
2 1/2 fl oz milk
13 oz strong white flour
3 oz strong malted flour (granary flour)
6 oz peeled weight of grated courgette
1 tsp salt
1 1/2 tsp sugar
1 1/2 oz butter
1 1/2 tsp yeast

Place all the ingredients into the bread machine in the appropriate order and set to dough. It is worth hanging around to check on the dough as it mixes in case you need to adjust the flour/liquid levels because the courgette will add an unknown amount of moisture so it might be a bit sticky or a bit dry. Once the dough is ready, turn it out onto a floured surface and knock it back. Cut into 8 equal portions and shape into rolls. Place on a greased baking sheet, well spaced out and cover with oiled clingfilm. Leave to rise for about an hour then bake for 20-25 minutes at 200°C/gas 6 until golden. Don't forget to throw some water into the bottom of the oven when you put them into the oven to make it nice and steamy. Cool on a wire rack.

Friday, 21 August 2015

Regular Cake

When my youngest daughter was little, she had a digestive issue that caused me to take her to the doctors. The doctor determined that she needed to drink more fluids and eat more fibre. As she is commonly known at home as “the fruit monster” and prefers wholemeal bread, rice and pasta, it seemed unlikely that fibre was the problem. So I upped her fluid intake but still decided to see if there was any way I could cram a bit more fibre into her diet. The doctor had advised that I should feed her dried fruit such as prunes, dates and figs so I took this on board and combined them all, and some other dried fruit, into a cake. We were about to go away on holiday at the time so taking away a nice, sturdy fruitcake seemed like the perfect solution and, of course, it was something we could all enjoy. It seemed only appropriate, given the circumstances, to name this cake “Regular Cake”.

My daughter’s digestive issues were short lived, I’m pleased to say, but the cake has become a firm favourite and is one I always turn to when we are going on holiday, particularly for our 3 week summer holiday. It travels well and keeps well and is a handy way to use up whatever open packs of dried fruit I have in the cupboards. When we leave it is the end of the soft fruit season and I have been busy making fresh jam and light fruity desserts such as cheesecakes. When we return, we face a glut of courgettes, cucumbers, tomatoes and tree fruit, all in desperate need of being transformed into chutney. It is nice, therefore, to have used up the old packs of dried fruit, ready to buy fresh packs for the chutneys.

I usually have to hand dried apricots (from Apple & Apricot Chutney), dates (from all sorts of chutney), figs (from Figgy Pear Mincemeat), sultanas (from various chutneys) and mixed dried fruit (from mincemeats) but you can use any kind of dried fruit as long as the totals add up the same. The recipe also calls for 85g of marmalade – something I always have to hand – so any flavour of marmalade is fine. And, it is perfectly fine to substitute the orange in the recipe for a lemon, depending on what you have available. The overall flavour will vary slightly depending on the ingredients you throw into it but whatever you use it will be a deliciously fruity cake with a citrus undertone.

Regular Cake

200g softened unsalted butter
200g light muscovado sugar
3 eggs
Zest and juice of 1 orange
85g orange marmalade
100g dried figs, chopped
100g dried prunes, chopped
100g dried apricots, chopped
100g dried dates, chopped
50g glace cherries, rinsed, dried and chopped
225g plain flour
1 tsp baking powder
Pinch of salt
1 tsp mixed spice 


Preheat oven to 160°C and line a round cake tin. Cream together the butter and sugar then add the eggs (one at a time), orange juice and zest, marmalade and then the dried fruit. Sift in the dry ingredients and stir well. Spoon the mixture into the cake tin and bake for about 2 hours until a skewer comes out clean.


Thursday, 20 August 2015

Painting Pebbles

I love painting on pebbles and this is an activity I have enjoyed several times during mys girls' childhood. Having a purpose for collecting pebbles from a beach is always nice as I can't help filling my pockets with pebbles anyway. Over the years, the girls' paintings have advanced considerably from pebbles splodged with bright colours but no recognisable image, to convincing pieces of art.

Last year, for example, we chose a large flat rock each and painted them as rock pools using acrylic paints. After coating them in clear outdoor varnish, I wriggled them into the gravel in the back garden as completely unexpected reminders of the sea-side in our urban garden.


This year, I saw some cute fruit and vegetable painted pebbles on Pinterest and suggested to the girls that we could make some markers for out veg garden. It was fun walking along the beach, picking up pebbles and saying things such as, "This one is courgette shaped." It was fun again a few days later to tip the pebbles out on the table and try to remember what vegetable we had thought they had resembled when we picked them up!

A little bit of head scratching later, we figured it out and got stuck in. Again we used acrylic paints, painting a nice strong base colour first then leaving that to dry thoroughly before adding the details. Then after several hours of drying, we used black pen to finish the faces off boldly. We just need to add the varnish before we take them out to the garden.


Wednesday, 19 August 2015

Any Old Peas

There is something delicious about the taste of the first peas of the season. My eldest daughter particularly looks forward to the moment when they are ready as she loves to pop them straight out of the pod and into her mouth. Often the first of the peas do not make it as far as the kitchen. Although she loves the flavour of peas, she hates the texture of cooked peas so outside of the short fresh pea season she will only eat frozen peas – still frozen!


Sadly, the season is very short and during that time it is important to go out at least every other day to pick the peas otherwise they will become over mature and the plant will see that its job is done and will stop producing new ones. It is so easy to miss some pods too, low down and hidden amongst the foliage. Even if you are very careful, it is not long before the plant goes over, shrivels up and dies. At this point, the plant has one last harvest to offer – a collection of over-ripe peas, with leathery pods and mealy peas inside. Although they look unpromising they can still be used. At its simplest, they can be boiled up with a bit of bicarbonate of soda to make mushy peas. If you have a particularly large amount then they can be turned into houmous, using these peas instead of the more conventional chickpeas. A small amount of these are just perfect for a batch of pea and ham soup.


Pea and Ham Soup (serves 2)

Oil (for frying)
1-2 shallots
1 small carrot
10-15cm of celery
2 oz of cooked potato
¾ pint of vegetable stock
6 oz of old peas
3 oz chopped ham


Chop the vegetables into small pieces then heat some oil in the bottom of a large saucepan and fry the onion, carrot, celery and potato for 5 minutes. Pour the stock into the pan and add the peas and 2 oz of the ham. Bring to the boil then simmer for 20 minutes. Remove the soup from the heat and use a food processor or hand blender to puree the soup until smooth. Taste and season.  Add the remaining chunks of ham and return the soup to the pan to heat through before serving with bread and butter.