JamMK header

JamMK header

Saturday, 27 October 2012

How to Carve A Halloween Pumpkin

With just a few days to go until Halloween, you may well be making plans for what to do on the day. The most obvious thing is to take your kids Treat or Treating, dressed up in appropriate fancy dress costumes. If you don't have children of your own at home then maybe you would like to have some treats ready for children who may come to door. It is readily accepted in many neighborhoods that Trick or Treaters will only call on houses that show a sign that they are welcome and the most usual sign for this is a carved Halloween pumpkin.

If you have never carved a pumpkin before, it really isn't as difficult as you might imagine and it is a great activity to do with your kids. Last week I read an article which said that children could be involved in the selecting of a design for the lantern but they mustn't help more than that because it is dangerous. After my last blog rant about kids and knives, you'll not be surprised to hear me say that I don't agree with this and that once again children can be involved if they are properly supervised, have the correct tools and are shown properly how to help.

So, the first task is to select your pumpkin. Children tend to go for the largest they can find but small ones are a lot quicker and easier to carve and look great too. All pumpkins have "sides" to them because they grow resting on the ground so one side is always flatter and rougher than the rest of it so decide which side is best to carve. To get started, cut a rough hexagonal shape around the stalk to make a removal lid. This can be done with a large, pointed and sharp kitchen knife in a series of stabbing cuts downwards through the flesh and into the void in the centre of the fruit. I would recommend that this bit is done by an adult. Once cut, the lid can be removed but there will be some resistance because the gooey stuff inside will be holding it down but gentle tugging and twisting should release the lid.


Now the gooey stringy stuff and seeds needs to be removed and this is definitely a job everyone can get involved in. Hands are by far the best tools for this job and great fun can be had just because it is all so slimy and gross! Once the majority of the icky stuff is removed, use metal spoons to scrape away some of the flesh of the pumpkin, concentrating particularly on the side that will be carved to thin the wall here to make it easier to carve. Save the pumpkin flesh for cooking later.


The next step is to decide on the design to go on the pumpkin. There are lots of images on the web and you can also buy template books, or you can just draw a design. If you feel particularly confident, draw the design directly onto the pumpkin with a suitable pen. Otherwise, tape a printed version of your design to the pumpkin and use a sharp point such as a drawing pin to prick points along the lines of your design to create a dot-to-dot pattern in the skin of the pumpkin to use as a guide one the printed design is removed.

The best tools to use for cutting a pumpkin are in fact pumpkin carving tools, which are readily available to buy these days in supermarkets and online. The small, serrated saw-like knifes cut through the pumpkin perfectly and are easy to use and change direction as you are cutting. If you have a tool like this then you should be able to let your child from about the age of 7 or 8 use it safely. If you don't and are using a kitchen knife then you'd better do the curving yourself as the knife will be more inclined to slip. So, using your tool, carefully cut out the shapes on your design, putting the pieces of removed pumpkin to one side to cook later. If your pumpkin wall is very thick, you may need to remove more pumpkin flesh from the inside of your pumpkin as you go.


If you would like to keep your pumpkin lantern for a few days then smear the inside and all the cut edges of the design with petroleum jelly to help keep the moisture in and the mould out. I have also found with experience that the heating that occurs when a tealight is lit inside the pumpkin is enough to encourage a growth of furry mould so using a battery powered tealight is better for the health of your lantern as well as for safety. If using a tealight, always leave the lid off when the candle is lit. If using a battery powered one you can put the lid back on.


With the bits of pumpkin that you have saved from your lantern you can make a yummy batch of Pumpkin Muffins, which make a lovely afternoon snack after all your hard work!

Pumpkin Muffins


1 lb (450g) pumpkin
3¼ oz (90 g) wholemeal flour
6½ oz (180g) self-raising flour
½ teaspoon mixed spice
¼ teaspoon grated nutmeg
3¾ oz (95g) dark brown sugar
2 oz (55g) sultanas
2 eggs
4 fl oz (115 ml) sunflower oil
4 fl oz (115 ml) whole milk
1 teaspoon vanilla extract

Peel, chop and steam the pumpkin for 20 to 30 minutes until very soft.  Squash until smooth then allow to cool. Refrigerate overnight if desired.  Preheat oven to 210°C, gas 7.  Sift the flours and spices into a bowl, adding any bran remaining in the sieve.  Whisk the eggs, oil, milk and vanilla together and add to the dry mix then add the pumpkin.  Combine until just mixed.  Spoon into paper cases in a tin.  Bake for 20 to 25 minutes until a skewer comes out clean.  Cool on a wire rack.


Sunday, 21 October 2012

Kids, Kitchens and Knives

We are all familiar with the story of Sleeping Beauty. Like so many fairy tales, there is a moral to it but it is parents who can learn from it. So terrified of the curse put upon their daughter, the king and queen burnt all the spinning wheels in the kingdom in order to prevent Sleeping Beauty ever coming into contact with one. Surely, if they had left the textile industry intact and merely explained to their daughter about the curse she would have known to have steered well clear of the spinning wheel in the tower.

I know what you're thinking, what's this got to do with anything jam related? Well, as you'll know I have two young apprentices (my 8 and 10 year old daughters), who when in the right mood, can be rather helpful in the kitchen. But for many people kids and kitchens don't mix. It is certainly true that most accidents happen in the home and of all the rooms in the home, the kitchen is the most dangerous. It is little wonder then that people choose to keep their kids well clear. However, it is my belief that children can and should be part of the kitchen, just suitably educated on the dangers to help them stay safe.

6 and 4 years old, already helping in the kitchen
The main dangers in the kitchen are of course the oven/hob and knives. When my children were babies and toddlers I had a stair gate across the middle of kitchen so that they could not get anywhere near these dangers. They were simply too young to understand the dangers. But as they have grown up I have allowed them into the kitchen, explaining along the way what the dangers are and why. The stair gate is long gone and  they have been using the hob and knives under supervision for several years now. In my opinion, the biggest danger in the kitchen is ignorance. Showing them how to do things safely is the way forward.

When my eldest daughter was in Year 2 (6-7 year olds), I ran the Let's Get Cooking club at her school. Each week I had a group of 6 children to teach cooking skills to. Using the hob and knives were an important part of this club. It was heartening to be allowed in a school situation to teach these useful skills and for health and safety to not be so over the top as to block this.

When my daughter entered Year 3 she moved to the next school up and spent the first 6 weeks of the autumn term learning how to make a sandwich in her DT lessons. How exasperating! Sandwiches?! This is a child who can make a Victoria sandwich cake! The same child who made Piccalilli from scratch as a Christmas gift to her teacher the same year.

Making Piccalilli aged 8
I know, teaching a child one to one at home how to use a knife safely is something far removed from trying to do it with a class of 30. But, hey, I used to be a secondary Science teacher and used to have classes of  30 hormonal teenagers using Bunsen burners, chemicals and scalpels! Seven years of teaching and no one ever ended up in hospital. We really do need to have faith in our children and allow them to learn how to do things safely rather than just not allowing them to do it for fear of injury.

So, given that knife skills is not something children are likely to learn in school, take the opportunity to teach them to your children if you can. I'm not talking about chefy knife skills - you know, that super quick chopping thing they do - just basic correct handling of a knife and safe chopping.

Here is my list of key points for children for being safe with knives.

1. Never use a knife unless there is an adult with you.

2. Choose the correct knife for the job - not too big or too small, and not too sharp or too blunt for the task.

3. When carrying a knife always hold it down by your side, pointing towards the floor.

4. Always use a chopping board to protect both the work surface and the knife blade.

5. Make sure your work area is tidy so that you can move freely without knocking things over.

6. Make sure your hands are clean and dry so that you have a firm grip.

7. Use the correct grip (claw or bridge) on the food to keep your fingers away from the knife blade and re-position them as necessary as you work.

Bridge

Claw


8. Watch what you are doing at all times, concentrate and take your time.

9. Never put your knife into a bowl of washing up. Instead, keep hold of it and carefully wipe the blade clean with a brush or sponge.

With a little practice you too could have a useful, trustworthy kitchen helper and someone set up with some really important life-skills.

Friday, 12 October 2012

Making the best of the end of the season

As much as we would like summer to go on forever, it is now very definitely autumn and the end of the growing season. With nothing much growing from now until the rhubarb season, it is important to gather in the last of the crops and make the most of them.

There is always a frost in October and frosts damage the non-hardly plants. In particular, this means things such as tomatoes, peppers, cucumber, courgettes, squash, pumpkins, runner and French beans, and sweetcorn. So rather than leaving these late crops outside to be damaged, gather them in beforehand and get them stored and preserved.

It doesn't matter too much if the crops that are harvested now are not quite ripe because many of them will continue to ripen when picked or they can be used as they are. Green tomatoes can be used to make Green Tomato Chutney (see recipe below). This is a favourite of mine because it was something my grandma would make every year and I grew up with cheese and chutney sandwiches. It is a very handy way to use up unripe tomatoes that would otherwise have no purpose. It is true that many green tomatoes will remain green and never ripen, but others will ripen if left in a suitable place for a week or too. A warm, sunny place, such as a windowsill, greenhouse or conservatory is ideal. To help them ripen, place a ripe fruit such as an apple or banana near them. This will slowly release ethylene which will cause the tomatoes to ripen.


Similarly, peppers will ripen fully if they are picked as they are just beginning to turn, although of course they can be used green anyway. Pumpkins and squash can be picked green too and they will gradually ripen. It is important to cut them with a few inches of dried stem left on, otherwise rot will get in. If intact, they should store nicely until the end of the year.


Courgettes and cucumbers store surprisingly well in open cupboard boxes in a cool place such as a shed or garage for several weeks. In fact, they seem to survive better like this than refrigerated. Again they need to have a bit of stem attached and be free from blemishes so they don't rot. With time the skins toughen so you may like to peel them before using them and cucumbers will continue to "ripen" too, eventually turning yellow and bitter.


All these crops are perfect for making into chutney, along with other stored ingredients such as apples, onions and garlic. So, between October and December, work your way through these stores, making a variety of different chutneys and by Christmas you'll have converted your stored vegetables into a cupboard full of delicious chutneys that should last you all the way to the next end of season.

Grandma's Green Tomato Chutney


Ingredients (makes 2-4 jars)
2lb (900 g) green tomatoes
1lb (450 g) cooking apples
8 oz (225 g) onions
1 oz (25 g) salt
4 oz (110 g) sultanas
1 pint (600 ml) malt vinegar
½ tsp ground ginger
1 tbsp pickling spice (e.g. cloves, cinnamon, allspice berries)
8 oz (225 g) light brown sugar
1 tbsp black treacle

Method
Coarsely chop the tomatoes then peel, core and chop the apples (weigh after preparation).  Peel and chop the onions and tie the spices in a piece of muslin.  Mix all the ingredients except the sugar in the preserving pan and bring to the boil. Drop in the spices. Simmer gently, uncovered, until the pulp is tender (20 to 30 minutes). Add the sugar and stir well until it has completely dissolved.  Bring back to the boil and continue to boil until thick. Pour into warm jars and seal immediately.


Saturday, 8 September 2012

Raspberry Cordial

Earlier this week I ran out of Raspberry Cordial. By the end of the week I had made some more as I really didn't want to be without this surprisingly useful ingredient for long.


So what can you do with Raspberry Cordial?

Firstly, you can drink it - either diluted with water as a soft drink, or splashed into alcoholic drinks as a mixer. On the drinking theme, you can also put a little into milk to make a lovely raspberry milkshake. This is perhaps how I use up most of my stocks.

Along similar lines, it can be used to flavour plain yoghurt or rippled through ice-cream. A little dish of it is lovely to use as a dip with other fruit such as slices of apple or banana or even just mini doughnuts or biscuits. And a drizzle of it can lift a fruit salad.

I have in the past also made a very quick and easy cheesecake by mixing it with some marscarpone - and we all know how much I love cheesecake!

Mmmm... did someone say cheesecake?

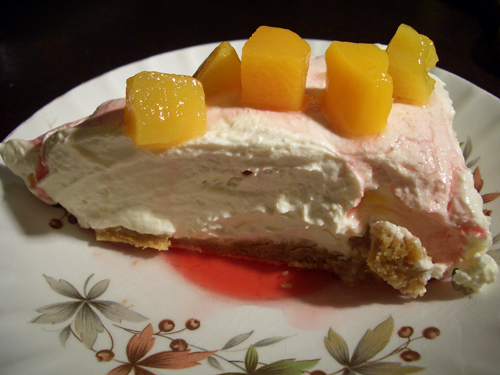
The front cover of the August Good Food Magazine has on it a Peach Melba Cheesecake and it has been taunting me all month. Peach Melba - a dish traditionally consisting of peaches, vanilla ice-cream and raspberry sauce... So, having re-stocked with Raspberry Cordial, I now had an easy way to adapt the recipe to make it even easier to make.

Peach Melba Cheesecake

55g melted butter
55g digestive biscuits
55g ginger biscuits
300g soft cheese
55g icing sugar
1 tsp vanilla extract
150ml double cream
Raspberry Cordial
200g diced peaches

Line the base of a loose bottomed circular tin. Blitz the biscuits in a food processor and mix thoroughly with the melted butter. Press into the bottom of the tin and chill in the refrigerator. In a bowl, combine the cheese, sugar and vanilla. Add the cream and whisk until thick. Drop in half the peaches and several splashes of raspberry cordial then spoon the mixture onto the base, allowing the peaches and cordial to slightly mix in as it does in. Smooth the cheesecake level and refrigerate for several hours or overnight. To serve, cut into slices and drizzle a little raspberry cordial on to each slice and spoon on a few chunks of peaches.


Raspberry Cordial


2 lb (900g) raspberries
1 pint (660ml) red grape juice
Granulated sugar

Gently heat the raspberries in the red grape juice in a large pan for a few minutes until the raspberries have broken up. Strain the liquid through a nylon (not metal) sieve. For every pint of liquid, weigh out 8 oz granulated sugar. Clean the pan and return the liquid to it, along with the sugar. Bring to the boil, stirring to dissolve the sugar then remove from the heat. Pour into warmed bottles and seal. Refrigerate once cooled.

Saturday, 1 September 2012

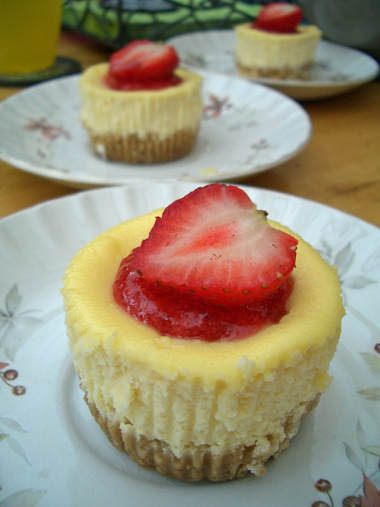
Individual Strawberry Cheesecakes

Thumbing through the August edition of the Good Food magazine, I came across a recipe for Little Strawberry Cheesecakes with the subtitle "The cutest cheesecakes you'll ever make". Yes, they did look lovely in the photo and as they required strawberry jam they seemed irresistible to me!

So this morning I made a batch of Summer Fruit Jam with some of the lovely Grenadier apples Laurence from Virtual Orchard had given me earlier in the week and some strawberries and raspberries from the freezer. OK it's not strawberry jam but it's just as good so this afternoon I made individual strawberry cheesecakes with some slight modifications from the Good Food recipe. And they turned out to be just the ticket for dessert after an epic 4 hour bike ride this afternoon!

Individual Strawberry Cheesecakes - makes 7

55g (2oz) butter
6 digestive biscuits
250g tub ricotta
55g (2oz) icing sugar
1 egg
1/2 teaspoon vanilla extract
150ml (4 fl oz) double cream
7 teaspoons Summer Fruit or Strawberry Jam
4 strawberries

Preheat an oven to 150°C, gas mark 2 and put 7 paper cases into a muffin tin. Melt the butter then blitz the biscuits in a food process and mix with the butter. Press the biscuit mix into the bottom of each paper case. Chill these whilst you prepare the filling. In a bowl, combine the ricotta, sugar, egg and vanilla. Whisk the double cream until it just holds its shape then stir into the the ricotta mix. Spoon the filling into the paper cases and smooth. Bake in the oven for 30 minutes then turn off the oven and leave the cheesecakes inside to cool completely. Later, chill the cheesecakes. When ready to serve, remove the cheesecakes from the muffin tray and carefully pull off the paper cases. Place on a small dish and top with 1 teaspoon of jam and half a strawberry.

Saturday, 25 August 2012

Fudge Ideas

Whenever I see fudge on sale at a show or fete, I will always buy some. I have successfully made fudge myself in the past but to be honest I would rather let someone else do it - the way some people feel about jam!

Anyway, when I came across The Fudge Lady on facebook a few months ago I was really pleased to find someone in Milton Keynes making fudge and I instantly thought that I would like to offer her fudge along side my Jammy Cow products. I have visions of gift bags and hamper boxes at Christmas filled with Jammy Cow preserves, homemade biscuits and fudge - a lovely mix of local, tasty foodie gifts.


With the Woburn Abbey Garden Show last weekend, I thought I would try out The Fudge Lady's fudge on my Jammy Cow table to see how it went. So, I happily accepted 10 bags each of Vanilla, Milk Chocolate and Rum and Raisin Fudge from her on the Friday and put them on sale over what turned out to be the hottest weekend of the year! Even so, I sold most of the bags and was left with about 8 bags in a mixture of the flavours.


I am a sucker for fudge and could very probably have eaten my way through all 8 bags within a fortnight but that would probably not have been a good idea. Instead, when my husband asked if I would make cakes for him to take into work for this birthday on Thursday I saw an opportunity to try out some fudge recipes. The Vanilla fudge went into Banana Fudge Muffins, the Milk Chocolate fudge went into Poptastic Popcorn, and the Rum and Raisin into Rum and Raisin fairy cakes. Needless to say, what with a batch of Rhubarb & Ginger jam tarts and my Cherry Bakewells, Steve did not have any cakes left at the end of the day to bring home.

Banana Fudge Muffins (makes 12)

250g self-raising flour
1 teaspoon baking powder
60g fudge
75g light brown sugar
75g butter
125ml milk
1 teaspoon vanilla extract
2 medium eggs
2 medium over-ripe bananas
Runny honey

Preheat the oven to 190°C, gas mark 5 and line a muffin tin with 12 paper cases. Sift the flour and baking powder into a bowl. Cut the fudge into small pieces and drop into the flour. Add the sugar and stir. Melt the butter in a pan over heat or in the microwave then add the milk, vanilla and eggs to it and beat to combine. In another bowl, mash the bananas. Pour the wet mix into the dry mix and add the bananas then mix quickly until just combined. Spoon the mixture into the paper cases and bake for 20 minutes. Cool for 5 minutes then  coat the tops of each muffin with runny honey.


Poptastic Popcorn (makes 12)

45g popping corn
A little vegetable oil
120g marshmallows
60g milk chocolate fudge, cut into small pieces

Heat the oil in a medium saucepan then add the popping corn, put on the lid and wait for the corn to pop, swirling the pan occasionally. Remove the popcorn from the pan and place in a bowl. Reserve 20g of marshmallows (cut into small pieces if necessary). Place 100g of the marshmallows in the pan and heat gently, stirring constantly, until the marshmallows have melted. Tip the popcorn, fudge pieces and marshmallow pieces into the melted marshmallows and stir well until well coated. Pull out portions of the mixture, mould into rough balls and place into paper cases then allow to cool completely.


Rum and Raisin Fairy Cakes (makes 12)

60g raisins
2 tablespoons dark rum
90g soft margarine
90g caster sugar
2 medium eggs
90g self-raising flour
20g cocoa powder
60g butter
50g icing sugar
10g cocoa powder
60g rum and raisin fudge

Put the raisins in a jar with the rum and leave to soak over night or longer. Preheat the oven to 190°C, gas mark 5 and line a fairy cake tin with paper cases. In a large bowl, cream together the margarine and sugar then add the eggs one at a time. Sift in the flour and cocoa powder and stir until well combined. Next, dab the raisins dry on kitchen paper then add to the batter. Spoon the batter into the paper cases then bake for 15 minutes. Cool on a wire rack. In the meantime, cream together the butter, icing sugar and cocoa powder to make butter icing. When the cakes are cool, dollop the butter icing onto the top of each cake. Cut the fudge into 12 pieces and place a piece of fudge on top of each cake.


Tuesday, 21 August 2012

Exceedingly Good Cherries

Whilst I was away on holiday, Laura went along to The Strawberry Farm in Aspley Guise. Despite it's name, they sell cherries there to the public during the summer, harvested from their 1000 trees. She came home with several pounds of beautiful dark cherries and amazingly managed to resist scoffing the lot, instead making them into batches of Cherry Jam and Cherry & Almond Jam for Jammy Cow.


I have been making Cherry & Almond Jam from the cherries that grow in my garden for years now and when people ask me about it I always say that it tastes like cherry bakewell. Weirdly, however, I've had very little experience with cherry bakewells - beyond eating them! I have to confess that Mr Kiplin's individual ones are the ones filed as my mental image. I have never, ever had a go at making a cherry bakewell and didn't actually know what went into them until I did a recipe search on the internet. You know, the only cherry that goes into a cherry bakewell is the half a one on top! Even the jam used usually is strawberry or raspberry!


Well, with a fresh batch of Cherry & Almond Jam at my disposal I decided it was time to make my own version of a cherry bakewell - only this time with ingredients that have actual cherries in!

Individual Cherry Bakewells

1 sheet of Jus-Rol sweet all butter shortcrust pastry
1 x 110g Jammy Cow Cherry & Almond Jam

3 oz (85g) self-raising flour
2 oz (55g) butter at room temperature
2 oz (55g) caster sugar
1 large egg
2 drops of almond extract
4 oz (110g) icing sugar
6 glace cherries

Preheat oven to 190°C. Cut out 12-16 pastry circles and place them into aluminium cases in a suitable baking tin. Blind bake the cases for about 10 minutes. Allow to cool for a few minutes then put about half a teaspoon of jam into the bottom of each pastry case. Cream together the butter and sugar then mix in the egg and almond extract. Sift in the flour and mix to form a batter. Place a teaspoon of the mixture on top of the jam and bake for 10 to 12 minutes until risen and golden. Cool on a wire rack. Mix the icing sugar with a tiny amount of water until to forms a stiff, gloopy icing. Dollop icing on top of each cake and finish with half a glace cherry on each tart.